CODE FOR SPEED DETECTOR
#include <LiquidCrystal.h>
const int rs = 7, en = 6, d4 = 5, d5 = 4, d6 = 3, d7 = 2;
LiquidCrystal lcd(rs, en, d4, d5, d6, d7);
int sen1=11;
int sen2=12;
unsigned long t1=0;
unsigned long t2=0;
float velocity;
void setup()
{
lcd.begin(16, 2);
pinMode(sen1,INPUT);
pinMode(sen2,INPUT);
Serial.begin(9600);
lcd.setCursor(0,0);
lcd.print(" Speed Detector ");
}
void loop()
{
while(digitalRead(sen1));
while(digitalRead(sen1)==0);
t1=millis();
while(digitalRead(sen2));
t2=millis();
velocity=t2-t1;
velocity=velocity/1000;//convert millisecond to second
velocity=(5.0/velocity);//v=d/t
velocity=velocity*3600;//multiply by seconds per hr
velocity=velocity/1000;//division by meters per Km
for(int i=5;i>0;i
){
lcd.setCursor(3,1);
lcd.print(velocity);
lcd.print(" Km/hr ");
delay(500);
lcd.setCursor(3,1);
lcd.print(" ");
delay(500);
}
}
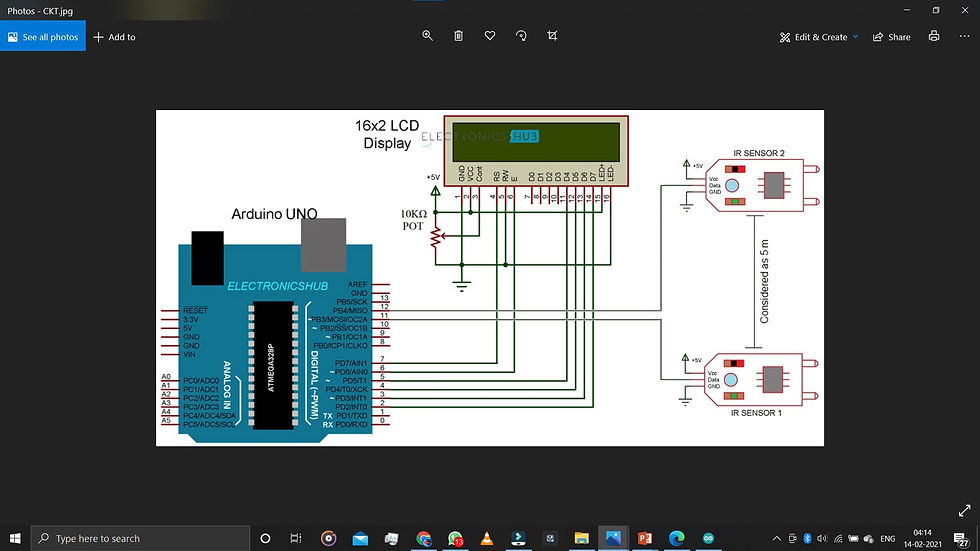
SPEED DETECTOR CIRCUIT

Image Title
BLUETOOTH CAR
ARDUINO CODE
#include <AFMotor.h>
//initial motors in
AF_DCMotor motor1(1, MOTOR12_1KHZ);
AF_DCMotor motor2(2, MOTOR12_1KHZ);
AF_DCMotor motor3(3, MOTOR34_1KHZ);
AF_DCMotor motor4(4, MOTOR34_1KHZ);
char command;
void setup()
{
Serial.begin(9600); //Set the baud rate to your Bluetooth module.
}
void loop(){
if(Serial.available() > 0){
command = Serial.read();
Stop(); //initialize with motors stoped
//Change pin mode only if new command is different from previous.
//Serial.println(command);
switch(command){
case 'F':
forward();
break;
case 'B':
back();
break;
case 'L':
left();
break;
case 'R':
right();
break;
}
}
}
void forward()
{
motor1.setSpeed(255); //Define maximum velocity
motor1.run(FORWARD); //rotate the motor clockwise
motor2.setSpeed(255); //Define maximum velocity
motor2.run(FORWARD); //rotate the motor clockwise
motor3.setSpeed(255);//Define maximum velocity
motor3.run(FORWARD); //rotate the motor clockwise
motor4.setSpeed(255);//Define maximum velocity
motor4.run(FORWARD); //rotate the motor clockwise
}
void back()
{
motor1.setSpeed(255); //Define maximum velocity
motor1.run(BACKWARD); //rotate the motor anti-clockwise
motor2.setSpeed(255); //Define maximum velocity
motor2.run(BACKWARD); //rotate the motor anti-clockwise
motor3.setSpeed(255); //Define maximum velocity
motor3.run(BACKWARD); //rotate the motor anti-clockwise
motor4.setSpeed(255); //Define maximum velocity
motor4.run(BACKWARD); //rotate the motor anti-clockwise
}
void left()
{
motor1.setSpeed(255); //Define maximum velocity
motor1.run(BACKWARD); //rotate the motor anti-clockwise
motor2.setSpeed(255); //Define maximum velocity
motor2.run(BACKWARD); //rotate the motor anti-clockwise
motor3.setSpeed(255); //Define maximum velocity
motor3.run(FORWARD); //rotate the motor clockwise
motor4.setSpeed(255); //Define maximum velocity
motor4.run(FORWARD); //rotate the motor clockwise
}
void right()
{
motor1.setSpeed(255); //Define maximum velocity
motor1.run(FORWARD); //rotate the motor clockwise
motor2.setSpeed(255); //Define maximum velocity
motor2.run(FORWARD); //rotate the motor clockwise
motor3.setSpeed(255); //Define maximum velocity
motor3.run(BACKWARD); //rotate the motor anti-clockwise
motor4.setSpeed(255); //Define maximum velocity
motor4.run(BACKWARD); //rotate the motor anti-clockwise
}
void Stop()
{
motor1.setSpeed(0); //Define minimum velocity
motor1.run(RELEASE); //stop the motor when release the button
motor2.setSpeed(0); //Define minimum velocity
motor2.run(RELEASE); //rotate the motor clockwise
motor3.setSpeed(0); //Define minimum velocity
motor3.run(RELEASE); //stop the motor when release the button
motor4.setSpeed(0); //Define minimum velocity
motor4.run(RELEASE); //stop the motor when release the button
}
AUTOMATIC DOOR BELL
ARDUINO CODE
// defines pins numbers
const int trigPin = 9;
const int echoPin = 10;
const int buzzer = 11;
const int ledPin = 13;
// defines variables
long duration;
int distance;
int safetyDistance;
void setup() {
pinMode(trigPin, OUTPUT); // Sets the trigPin as an Output
pinMode(echoPin, INPUT); // Sets the echoPin as an Input
pinMode(buzzer, OUTPUT);
pinMode(ledPin, OUTPUT);
Serial.begin(9600); // Starts the serial communication
}
void loop() {
// Clears the trigPin
digitalWrite(trigPin, LOW);
delayMicroseconds(2);
// Sets the trigPin on HIGH state for 10 micro seconds
digitalWrite(trigPin, HIGH);
delayMicroseconds(10);
digitalWrite(trigPin, LOW);
// Reads the echoPin, returns the sound wave travel time in microseconds
duration = pulseIn(echoPin, HIGH);
// Calculating the distance
distance= duration*0.034/2;
safetyDistance = distance;
if (safetyDistance <= 5){
digitalWrite(buzzer, HIGH);
digitalWrite(ledPin, HIGH);
}
else{
digitalWrite(buzzer, LOW);
digitalWrite(ledPin, LOW);
}
// Prints the distance on the Serial Monitor
Serial.print("Distance: ");
Serial.println(distance);
}
MUSIC REACTIVE LIGHTS
ARDUINO CODE
int soundPin = A0;
int LED1 = 2;
int LED2 = 3;
int LED3 = 4;
int LED4 = 5;
int LED5 = 6;
int LED6 = 7;
int LED7 = 8;
int LED8 = 9;
void setup()
{
Serial.begin(9600);
pinMode(LED1, OUTPUT);
pinMode(LED2, OUTPUT);
pinMode(LED3, OUTPUT);
pinMode(LED4, OUTPUT);
pinMode(LED5, OUTPUT);
pinMode(LED6, OUTPUT);
pinMode(LED7, OUTPUT);
pinMode(LED8, OUTPUT);
}
void loop()
{
long sum = 0;
for(int i=0; i<100; i++) // taking 100 sample of sound
{
sum += analogRead(soundPin);
}
sum = sum/100; // average the sample of sound
if (sum>=100) digitalWrite(LED1, HIGH); else digitalWrite(LED1, LOW);
if (sum>=200) digitalWrite(LED2, HIGH); else digitalWrite(LED2, LOW);
if (sum>=300) digitalWrite(LED3, HIGH); else digitalWrite(LED3, LOW);
if (sum>=350) digitalWrite(LED4, HIGH); else digitalWrite(LED4, LOW);
if (sum>=400) digitalWrite(LED5, HIGH); else digitalWrite(LED5, LOW);
if (sum>=450) digitalWrite(LED6, HIGH); else digitalWrite(LED6, LOW);
if (sum>=500) digitalWrite(LED7, HIGH); else digitalWrite(LED7, LOW);
if (sum>=550) digitalWrite(LED8, HIGH); else digitalWrite(LED8, LOW);
delay(10);
Serial.println(sum);
}
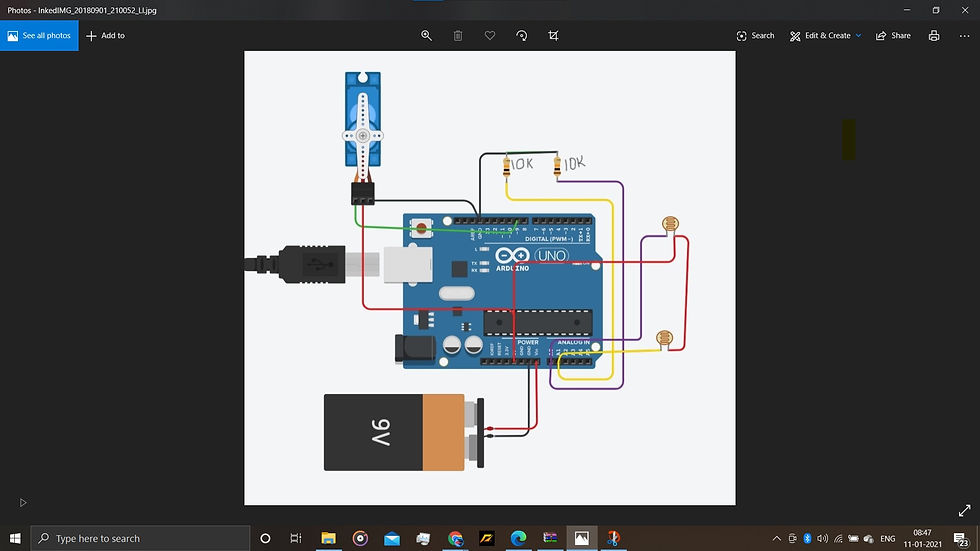
SOLAR TRACKER
SOLAR TRACKER
ARDUINO CODE
//The DIY Life //10 October 2016 //Michael Klements #include <Servo.h> Servo tracker; // create servo object to control a servo int eastLDRPin = 0; //Assign analogue pins int westLDRPin = 1; int eastLDR = 0; //Create variables for the east and west sensor values int westLDR = 0; int error = 0; int calibration = 204; //Calibration offset to set error to zero when both sensors receive an equal amount of light int trackerPos = 90; //Create a variable to store the servo position void setup() { tracker.attach(11); // attaches the servo on pin 11 to the servo object } void loop() { eastLDR = calibration + analogRead(eastLDRPin); //Read the value of each of the east and west sensors westLDR = analogRead(westLDRPin); if(eastLDR<350 && westLDR<350) //Check if both sensors detect very little light, night time { while(trackerPos<=160) //Move the tracker all the way back to face east for sunrise { trackerPos++; tracker.write(trackerPos); delay(100); } } error = eastLDR - westLDR; //Determine the difference between the two sensors. if(error>15) //If the error is positive and greater than 15 then move the tracker in the east direction { if(trackerPos<=160) //Check that the tracker is not at the end of its limit in the east direction { trackerPos++; tracker.write(trackerPos); //Move the tracker to the east } } else if(error<-15) //If the error is negative and less than -15 then move the tracker in the west direction { if(trackerPos>20) //Check that the tracker is not at the end of its limit in the west direction { trackerPos--; tracker.write(trackerPos); //Move the tracker to the west } } delay(100); }
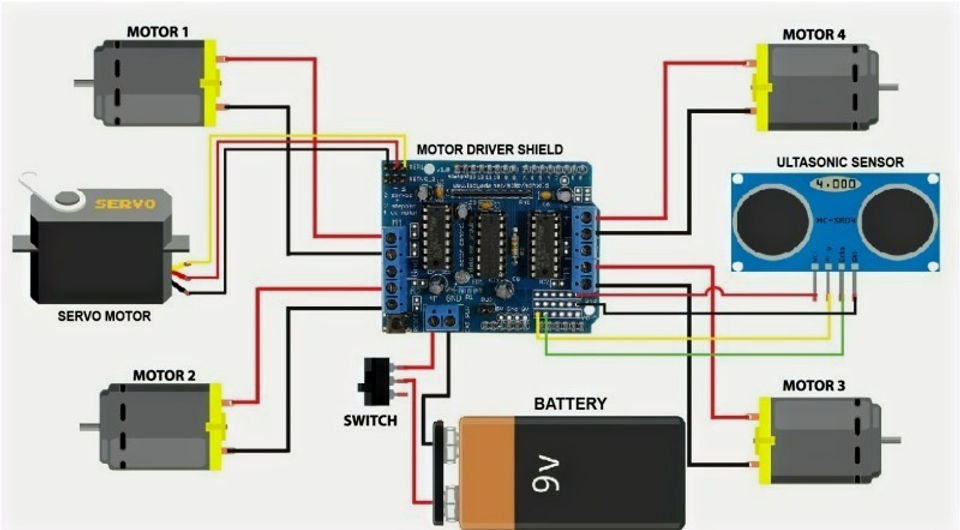
CIRCUIT FOR OBSTACLE AVOIDING CAR
Image Subtitle

CIRCUIT FOR OBSTACLE AVOIDING CAR
Embed Section Title
Embed Section Subtitle
This is your Embedded item paragraph. It’s a great place to add a description of your written, illustrated or visual content, as well as any other format that you have embedded in your site. Don’t hesitate to use this space to add valuable information for your users, and encourage them to take action.

Introducing E INNOVATOR
Our Story
Since our establishment, we’ve worked our way to become one of the top learning platforms online. Our commitment to providing unparalleled access to high quality videos has helped us maintain a clear focus in order to grow and flourish to what we are today.
The catalog at E INNOVATOR includes engaging and intuitive videos in various subjects, written for students of all levels. What are you waiting for? Join the E INNOVATOR community and take control of your own learning today. Browse our videos and get in touch with questions or concerns.